


Working with large data sets in Excel often involves dealing with names that are stored in a single column, which can make sorting and filtering difficult. Separating first and last names (or other name parts) into individual columns can greatly enhance the accuracy and functionality of your data. In this guide, we’ll walk you through the simple steps to separate names in Excel, ensuring your data is organized and ready for analysis. At Maptive, we believe in making data easy to manage so you can get the insights you need.
Step 1: Prepare Your Data
Before you start separating names, it’s essential to ensure that your data is consistent and clean. If there are any extra spaces or irregular formatting, now’s the time to fix it.
Here’s how to clean up your data in Excel before splitting the names:
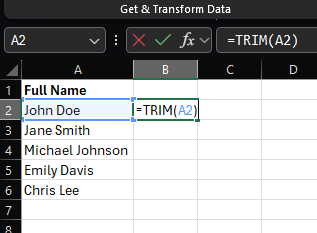
- Remove Extra Spaces: Use the TRIM function to remove any leading, trailing, or consecutive spaces within the cells containing names. For example, if you have a name in cell A2, you would use the formula =TRIM(A2) in cell B2 to remove extra spaces.
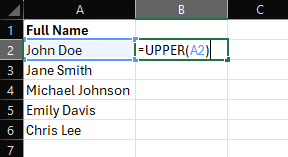
- Correct Capitalization: If necessary, standardize the capitalization of names. You can use functions like UPPER, LOWER, or PROPER to convert names to all uppercase, all lowercase, or proper case (e.g., “John Doe” to “John doe” or “JOHN DOE”).
- Handle Abbreviations: If your data contains abbreviations (e.g., “Jr.”, “Sr.”), ensure they are consistent in terms of capitalization and spacing. You might need to adjust them manually or use formulas to standardize them.
- Check for Special Characters: Look for any special characters (e.g., hyphens, apostrophes) that might interfere with the separation process. If necessary, remove or replace them.
Step 2: Use Excel’s Text to Columns Feature
Excel’s Text to Columns feature makes it easy to split names into separate columns based on specific characters, such as spaces or commas.
Here’s how you can do it:
- Select the Column Containing the Names: Click on the header of the column that contains the names you want to split.
- Go to the Data Tab: In the Excel ribbon, navigate to the “Data” tab.
- Click Text to Columns: Find and click the “Text to Columns” button.
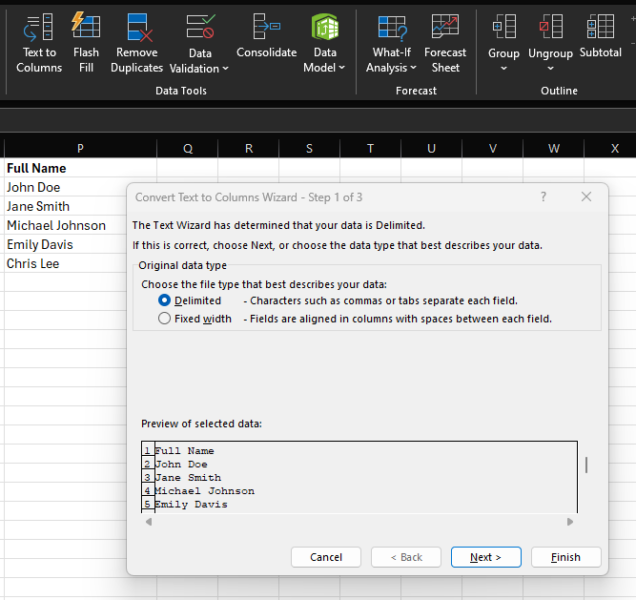
- Choose Delimited: In the “Convert Text to Columns Wizard,” select the “Delimited” option and click “Next.”
- Select the Delimiter: Choose the character that separates the first and last names in your data. In most cases, this will be a space. Check the box next to “Space.” If you have other delimiters (e.g., commas, hyphens), select them as well.
- Adjust Other Options (Optional): If needed, you can customize other options like the data format or column data type.
- Click Finish: When you’re satisfied with your settings, click “Finish.”
Your data will now be split into separate columns based on the specified delimiter.

Step 3: Handling Middle Names or Multiple Name Parts
If your dataset includes middle names or titles (e.g., “Dr. John Michael Doe”), you may need to repeat the Text to Columns process or use functions like FIND and MID to extract each name part.
Here’s how you can handle more complex names efficiently:
Method 1: Repeat Text to Columns
- Split by Space: Use Text to Columns to split the names based on spaces. This will initially create three columns: First Name, Middle Name, and Last Name.
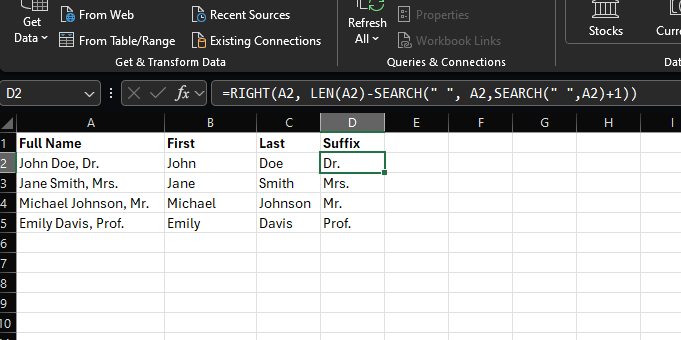
- Handle Titles (Optional): If titles (e.g., “Dr.”, “Mr.”) are included, you can use functions like SEARCH and LEFT to extract them into a separate column. For example:
- Extract the first name: =LEFT(A2,SEARCH(” “,A2)-1)
- Extract the last name: =MID(A2, SEARCH(” “,A2) + 1, SEARCH(“,”,A2) – SEARCH(” “,A2)-1)
- Extract the suffix: =RIGHT(A2, LEN(A2) – SEARCH(” “, A2, SEARCH(” “,A2)+1))
Method 2: Use Functions
- Find the First Space: Use the FIND function to locate the position of the first space in the name.
- Extract the First Name: Use the LEFT function to extract the characters before the first space.
- Find the Second Space: Use the SEARCH function again to locate the position of the second space.
- Extract the Middle Name: Use the MID function to extract the characters between the first and second spaces.
- Extract the Last Name: Use the RIGHT function to extract the characters after the second space.
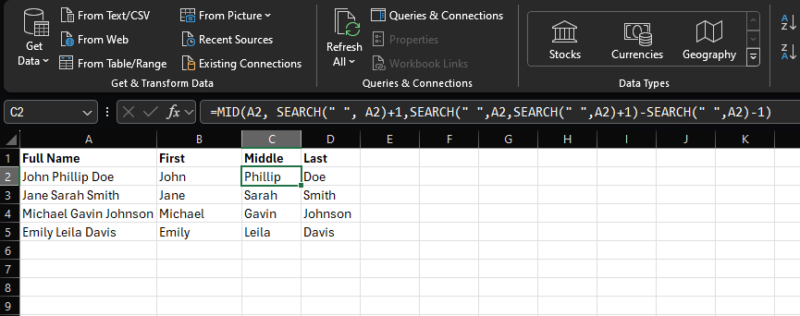
Assuming the name is in cell A2:
- First Name: =LEFT(A2, SEARCH(” “, A2)-1)
- Middle Name: =MID(A2, SEARCH(” “, A2)+1, SEARCH(” “, A2, SEARCH(” “, A2)+1)-SEARCH(” “, A2)-1)
- Last Name: =RIGHT(A2, LEN(A2)-SEARCH(” “, A2, SEARCH(” “, A2)+1))
Step 4: Common Issues and Troubleshooting
Sometimes, the results might not be what you expect due to inconsistent formatting in the original data.
Here are some quick fixes and tips to help troubleshoot common issues when separating names in Excel:
Inconsistent Formatting:
- Extra Spaces: Ensure there are no extra spaces before or after names. Use the TRIM function to remove them.
- Special Characters: Check for special characters like hyphens, apostrophes, or quotation marks that might interfere with the separation process. If necessary, replace or remove them.
- Capitalization: If capitalization is inconsistent (e.g., “John Doe” vs. “john doe”), standardize it using functions like UPPER, LOWER, or PROPER.
Incorrect Delimiter:
- Multiple Delimiters: If names are separated by multiple characters (e.g., spaces and commas), you might need to adjust the delimiter settings in the Text to Columns wizard.
- Non-Standard Delimiters: If your data uses non-standard delimiters (e.g., hyphens, periods), ensure they are selected correctly.
Incorrect Formulas:
- Syntax Errors: Double-check the syntax of your formulas to avoid errors.
- Cell References: Verify that cell references are correct and point to the intended cells.
- Function Arguments: Ensure that function arguments are provided in the correct order and format.
Data Quality Issues:
- Missing Data: If some names are missing parts (e.g., last names), you might need to adjust your formulas or consider manual intervention.
- Corrupted Data: Check for any corrupted cells or data that might be causing unexpected results.
Conclusion
Separating names in Excel is a quick and efficient way to organize your data and make it more usable for analysis and visualization. Once your data is properly organized, you can leverage it more effectively in tools like Maptive. By having names separated into distinct columns, you can easily map locations, analyze patterns, and gain valuable insights from your data.
To learn more about data management tips and techniques, be sure to check out Maptive’s blog. And if you’re ready to take your data analysis to the next level, start your free trial of Maptive today and experience the power of its intuitive mapping and visualization tools.


